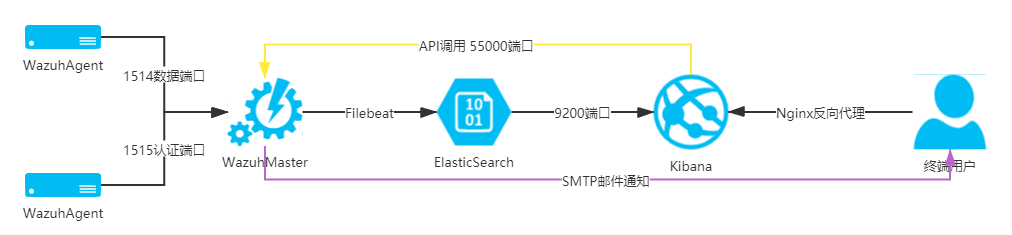
Wazuh的基本部署
本次将部署一套分布式Wazuh方案,实现其基本功能。其中:
- wazuh-master启用全功能组件;
- ElasticStack将使用官方基本授权,不启用X-pack和加密连接;
- Linux版本Agent将安装到Kibana主机和ElasticSearch主机上,不再额外安装示例主机;
- 各个功能组件采用单节点部署;
- Wazuh使用4.1.5版本,搭配官方指定7.11.2ElasticStack版本。
部署方案
部署拓扑

网络地址
系统角色 版本 网络地址 ElasticSearch 7.11.2 192.168.248.146 Kibana 7.11.2 192.168.248.145 WazuhMaster 4.1.5 192.168.248.150 WazuhAgent 4.1.5 192.168.248.1
部署实施
ElasticSearch的安装
1
2
3
4
5
6
7
8
9
10
11
12
13
14
15
16
17
18
19
20
21
22
23
24
25
26
27
28
29
30
31
32
33
34
35
36
37
38
39
40
41
42
43
44
45
46
47
48
49
50
51
52
53
54
55
56
57
58
59
60
61
62
63
64
65安装前置软件
yum install -y zip unzip curl
导入秘钥
rpm --import https://artifacts.elastic.co/GPG-KEY-elasticsearch
增加官方源
cat > /etc/yum.repos.d/elastic.repo << EOF
[elasticsearch-7.x]
name=Elasticsearch repository for 7.x packages
baseurl=https://artifacts.elastic.co/packages/7.x/yum
gpgcheck=1
gpgkey=https://artifacts.elastic.co/GPG-KEY-elasticsearch
enabled=1
autorefresh=1
type=rpm-md
EOF
安装软件
yum makecache
yum upgrade -y
yum install -y elasticsearch-7.11.2
导入配置文件
mv /etc/elasticsearch/elasticsearch.yml /etc/elasticsearch/elasticsearch.yml-bak
touch /etc/elasticsearch/elasticsearch.yml
cat > /etc/elasticsearch/elasticsearch.yml << EOF
cluster.name: elastic
node.name: elasticnode1
network.host: 192.168.248.146
cluster.initial_master_nodes: ["elasticnode1"]
path.data: /var/lib/elasticsearch
path.logs: /var/log/elasticsearch
EOF
开通防火墙
firewall-cmd --permanent --add-service=elasticsearch
firewall-cmd --reload
启动服务
systemctl daemon-reload
systemctl enable elasticsearch
systemctl start elasticsearch
校验服务
使用其他主机访问es环境
curl -XGET http://192.168.248.146:9200
{
"name" : "elasticnode1",
"cluster_name" : "elastic",
"cluster_uuid" : "ahjxhVEHREKNmBAfjcuyNw",
"version" : {
"number" : "7.11.2",
"build_flavor" : "default",
"build_type" : "rpm",
"build_hash" : "3e5a16cfec50876d20ea77b075070932c6464c7d",
"build_date" : "2021-03-06T05:54:38.141101Z",
"build_snapshot" : false,
"lucene_version" : "8.7.0",
"minimum_wire_compatibility_version" : "6.8.0",
"minimum_index_compatibility_version" : "6.0.0-beta1"
},
"tagline" : "You Know, for Search"
}
禁用软件源,避免非控升级组件
sed -i "s/^enabled=1/enabled=0/" /etc/yum.repos.d/elastic.repoKibana的安装
1
2
3
4
5
6
7
8
9
10
11
12
13
14
15
16
17
18
19
20
21
22
23
24
25
26
27
28
29
30
31
32
33
34
35
36
37
38
39
40
41
42
43
44
45
46
47
48
49
50
51
52
53
54
55
56
57
58
59
60
61
62
63
64
65
66
67
68
69
70
71
72安装前置软件
yum install -y zip unzip curl
导入源秘钥
rpm --import https://artifacts.elastic.co/GPG-KEY-elasticsearch
增加官方源
cat > /etc/yum.repos.d/elastic.repo << EOF
[elasticsearch-7.x]
name=Elasticsearch repository for 7.x packages
baseurl=https://artifacts.elastic.co/packages/7.x/yum
gpgcheck=1
gpgkey=https://artifacts.elastic.co/GPG-KEY-elasticsearch
enabled=1
autorefresh=1
type=rpm-md
EOF
安装软件
yum makecache
yum upgrade -y
yum install -y kibana-7.11.2
修改配置文件
cp /etc/kibana/kibana.yml /etc/kibana/kibana.yml-bak
cat >> /etc/kibana/kibana.yml << EOF
server.port: 5601
server.host: "localhost"
server.name: "kibana"
i18n.locale: "zh-CN"
elasticsearch.hosts: ["http://192.168.248.146:9200"]
kibana.index: ".kibana"
kibana.defaultAppId: "home"
server.defaultRoute : "/app/wazuh"
EOF
创建数据目录
mkdir /usr/share/kibana/data
chown -R kibana:kibana /usr/share/kibana
离线安装插件
wget https://packages.wazuh.com/4.x/ui/kibana/wazuh_kibana-4.1.5_7.11.2-1.zip
cp ./wazuh_kibana-4.1.5_7.11.2-1.zip /tmp
cd /usr/share/kibana
sudo -u kibana /usr/share/kibana/bin/kibana-plugin install file:///tmp/wazuh_kibana-4.1.5_7.11.2-1.zip
配置服务
systemctl daemon-reload
systemctl enable kibana
systemctl start kibana
禁用软件源,避免非控升级组件
sed -i "s/^enabled=1/enabled=0/" /etc/yum.repos.d/elastic.repo
配置反向代理
yum install -y nginx
systemctl enable --now nginx
vim /etc/ngix/nginx.conf.default
在server{}中添加配置项
```
proxy_redirect off;
proxy_set_header X-Real-IP $remote_addr;
proxy_set_header X-Forwarded-For $proxy_add_x_forwarded_for;
proxy_set_header Host $http_host;
location / {
proxy_pass http://localhost:5601/;
}
```
nginx -s reload
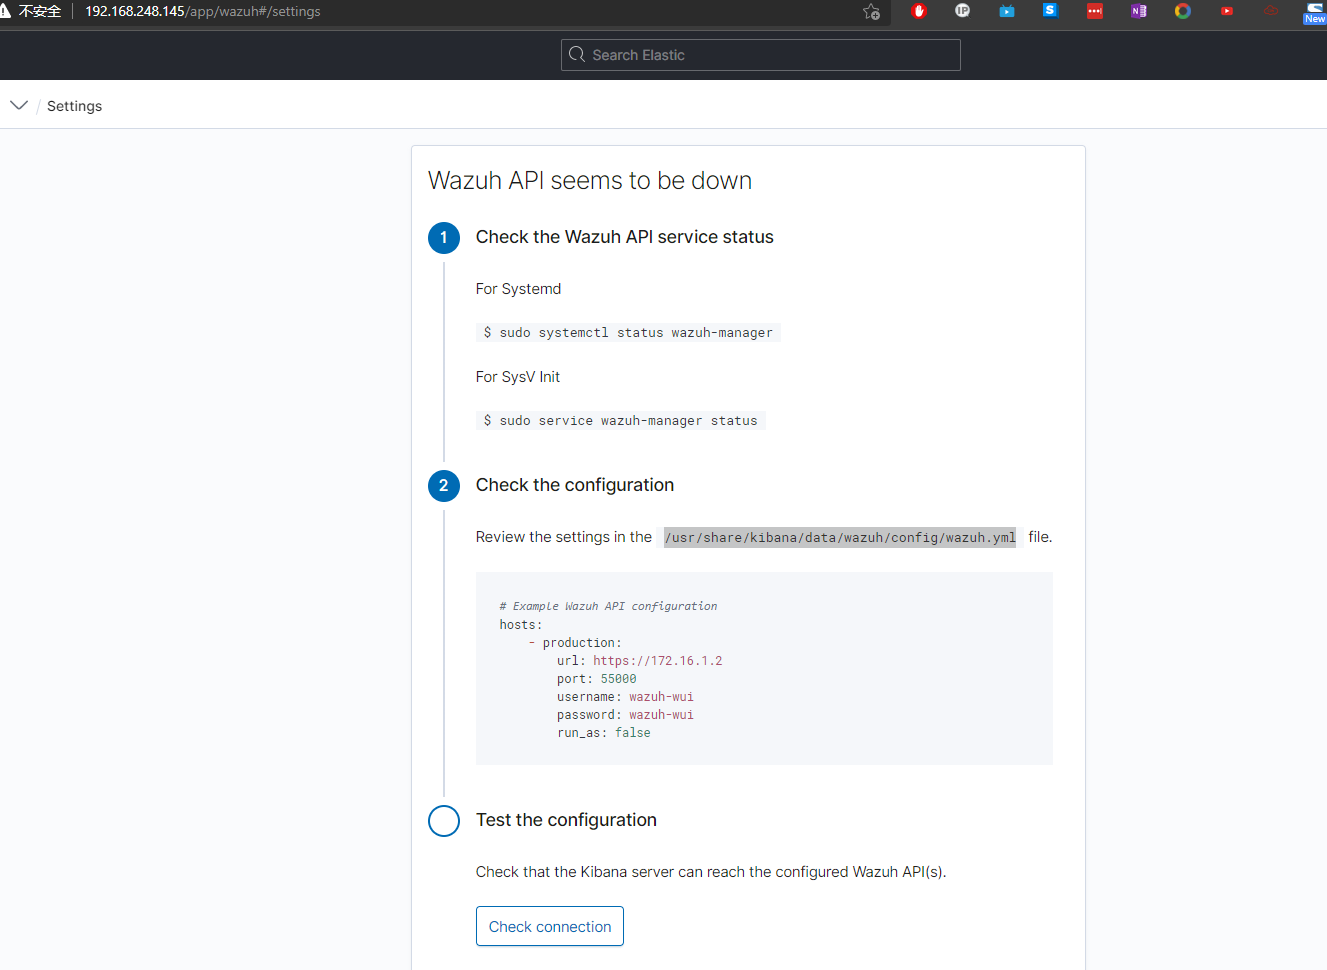
登录kibana之后选择wazuh插件
返回控制台修改插件配置文件
sed -i ‘:s/localhost/192.168.248.150/g’ /usr/share/kibana/data/wazuh/config/wazuh.ymlWazuhMaster的安装
1
2
3
4
5
6
7
8
9
10
11
12
13
14
15
16
17
18
19
20
21
22
23
24
25
26
27
28
29
30
31
32
33
34
35
36
37
38
39
40
41
42
43
44
45
46
47
48
49
50
51
52
53
54
55
56
57
58
59
60
61
62
63
64
65
66
67
68
69
70
71
72
73
74
75
76
77
78
79
80
81
82
83
84
85
86
87
88
89
90
91安装前置软件
yum install -y zip unzip curl
导入秘钥
rpm --import https://packages.wazuh.com/key/GPG-KEY-WAZUH
rpm --import https://artifacts.elastic.co/GPG-KEY-elasticsearch
配置官方软件源
cat > /etc/yum.repos.d/wazuh.repo << EOF
[wazuh]
gpgcheck=1
gpgkey=https://packages.wazuh.com/key/GPG-KEY-WAZUH
enabled=1
name=EL-$releasever - Wazuh
baseurl=https://packages.wazuh.com/4.x/yum/
protect=1
EOF
cat > /etc/yum.repos.d/elastic.repo << EOF
[elasticsearch-7.x]
name=Elasticsearch repository for 7.x packages
baseurl=https://artifacts.elastic.co/packages/7.x/yum
gpgcheck=1
gpgkey=https://artifacts.elastic.co/GPG-KEY-elasticsearch
enabled=1
autorefresh=1
type=rpm-md
EOF
安装软件
yum makecache
yum upgrade -y
yum install -y wazuh-manager
yum install filebeat-7.11.2
配置Filebeat
mv /etc/filebeat/filebeat.yml /etc/filebeat/filebeat.yml-bak
touch /etc/filebeat/filebeat.yml
cat > /etc/filebeat/filebeat.yml<<EOF
filebeat.modules:
- module: wazuh
alerts:
enabled: true
archives:
enabled: false
setup.template.json.enabled: true
setup.template.json.path: '/etc/filebeat/wazuh-template.json'
setup.template.json.name: 'wazuh'
setup.template.overwrite: true
setup.ilm.enabled: false
output.elasticsearch.hosts: ['http://192.168.248.146:9200']
EOF
导入filebeat的wazuh日志模板
curl -so /etc/filebeat/wazuh-template.json https://raw.githubusercontent.com/wazuh/wazuh/4.1/extensions/elasticsearch/7.x/wazuh-template.json
chmod go+r /etc/filebeat/wazuh-template.json
导入filebeat的wazuh日志模型
curl -s https://packages.wazuh.com/4.x/filebeat/wazuh-filebeat-0.1.tar.gz | tar -xvz -C /usr/share/filebeat/module
配置防火墙规则
firewall-cmd --permanent --add-port={1514/tcp,1515/tcp,55000/tcp}
firewall-cmd --reload
禁用软件源,避免非控升级组件
sed -i "s/^enabled=1/enabled=0/" /etc/yum.repos.d/elastic.repo
sed -i "s/^enabled=1/enabled=0/" /etc/yum.repos.d/wazuh.repo
启动服务
systemctl daemon-reload
systemctl enable --now wazuh-manager
systemctl enable --now filebeat
验证Filebeat
filebeat test output
···
elasticsearch: http://192.168.248.146:9200...
parse url... OK
connection...
parse host... OK
dns lookup... OK
addresses: 192.168.248.146
dial up... OK
TLS... WARN secure connection disabled
talk to server... OK
version: 7.11.2
···
刷新kibanaWazuhAgent的安装(Linux)
1
2
3
4
5
6
7在es节点和kibana节点上安装
sudo WAZUH_MANAGER='192.168.248.150' WAZUH_AGENT_GROUP='default' yum install -y https://packages.wazuh.com/4.x/yum/wazuh-agent-4.1.5-1.x86_64.rpm
启动服务
sudo systemctl daemon-reload
sudo systemctl enable wazuh-agent
sudo systemctl start wazuh-agentWazuhAgent的安装(Windows)
1
2
# 使用管理员权限打开powershell控制台
Invoke-WebRequest -Uri https://packages.wazuh.com/4.x/windows/wazuh-agent-4.1.5-1.msi -OutFile wazuh-agent.msi; ./wazuh-agent.msi /q WAZUH_MANAGER='192.168.248.150' WAZUH_REGISTRATION_SERVER='192.168.248.150' WAZUH_AGENT_GROUP='default'

未完待续……
All articles on this blog are licensed under CC BY-NC-SA 4.0 unless otherwise stated.
Related Articles
2021-07-05
终端安全系统WAZUH的介绍
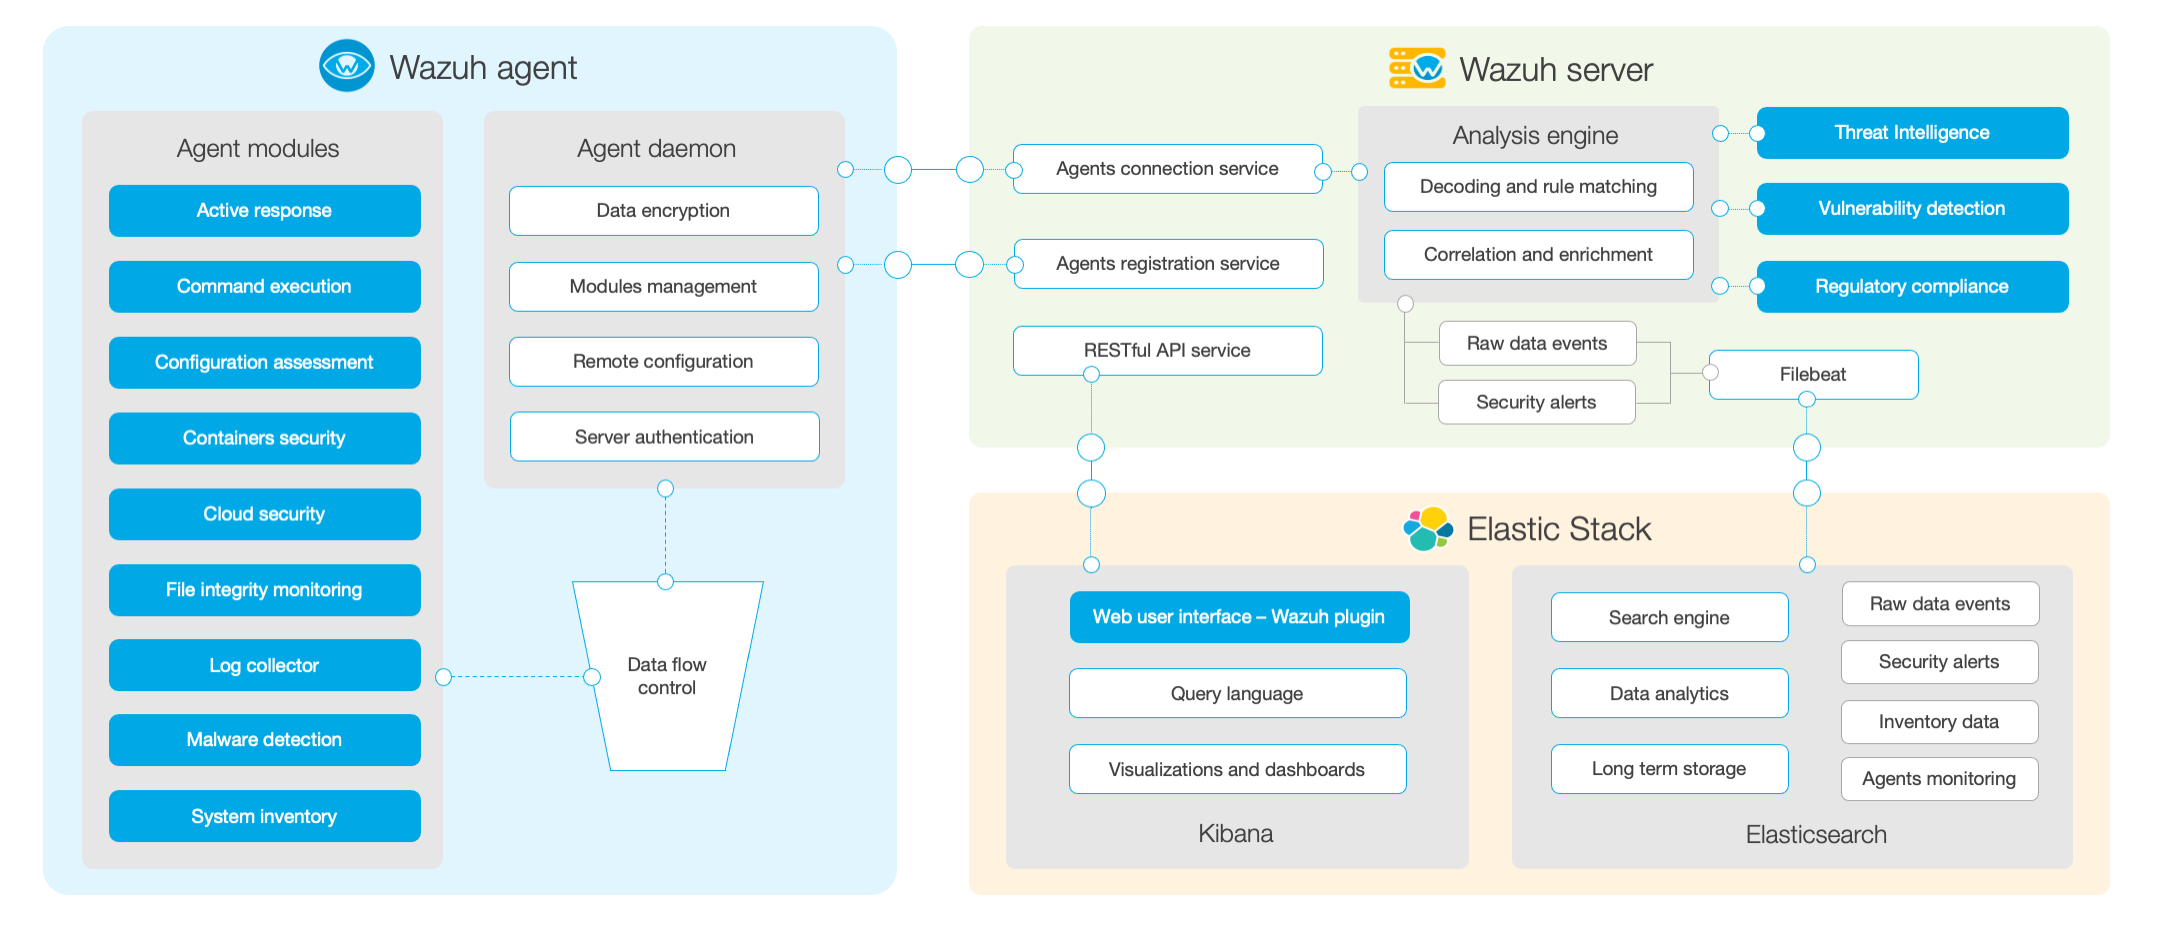
简介[Wazuh](Wazuh · The Open Source Security Platform)是一整套基于ossec安全检测工具和EFK日志工具构成的终端安全管理工具。不管是将其分类至HIDS,还是EDR,它都是一套通过监控主机日志行为,提供安全检测、分析和完整报告的开源、免费利器。Wazuh基于C/S架构,它的Agent支持Windows、MacOS、Linux、HP-UX、AIX等主流操作系统。其服务端负责提供认证和数据收集,然后通过filebeat进行日志清洗,最后导入ElasticSearch,通过Kinbana进行展示和输出日志。它不仅可以收集主机的事件日志进行一般的入侵检测功能,还可以通过第三方提供的系统漏洞检测feed文件,来实现主机的漏洞扫描和合规检查。 功能示例 组件模块Wazuh的组件分为三部分: 客户端的功能 收集日志和事件日志; 文件和注册表的监控; 运行进程和安装软件的信息收集; 监控系统端口和网络配置; 检测恶意软件; 配置管理和策略监控 检测主机响应 服务端 客户端的服务器注册; 实现客户端的连接服务; 根据各项规...
2021-07-07
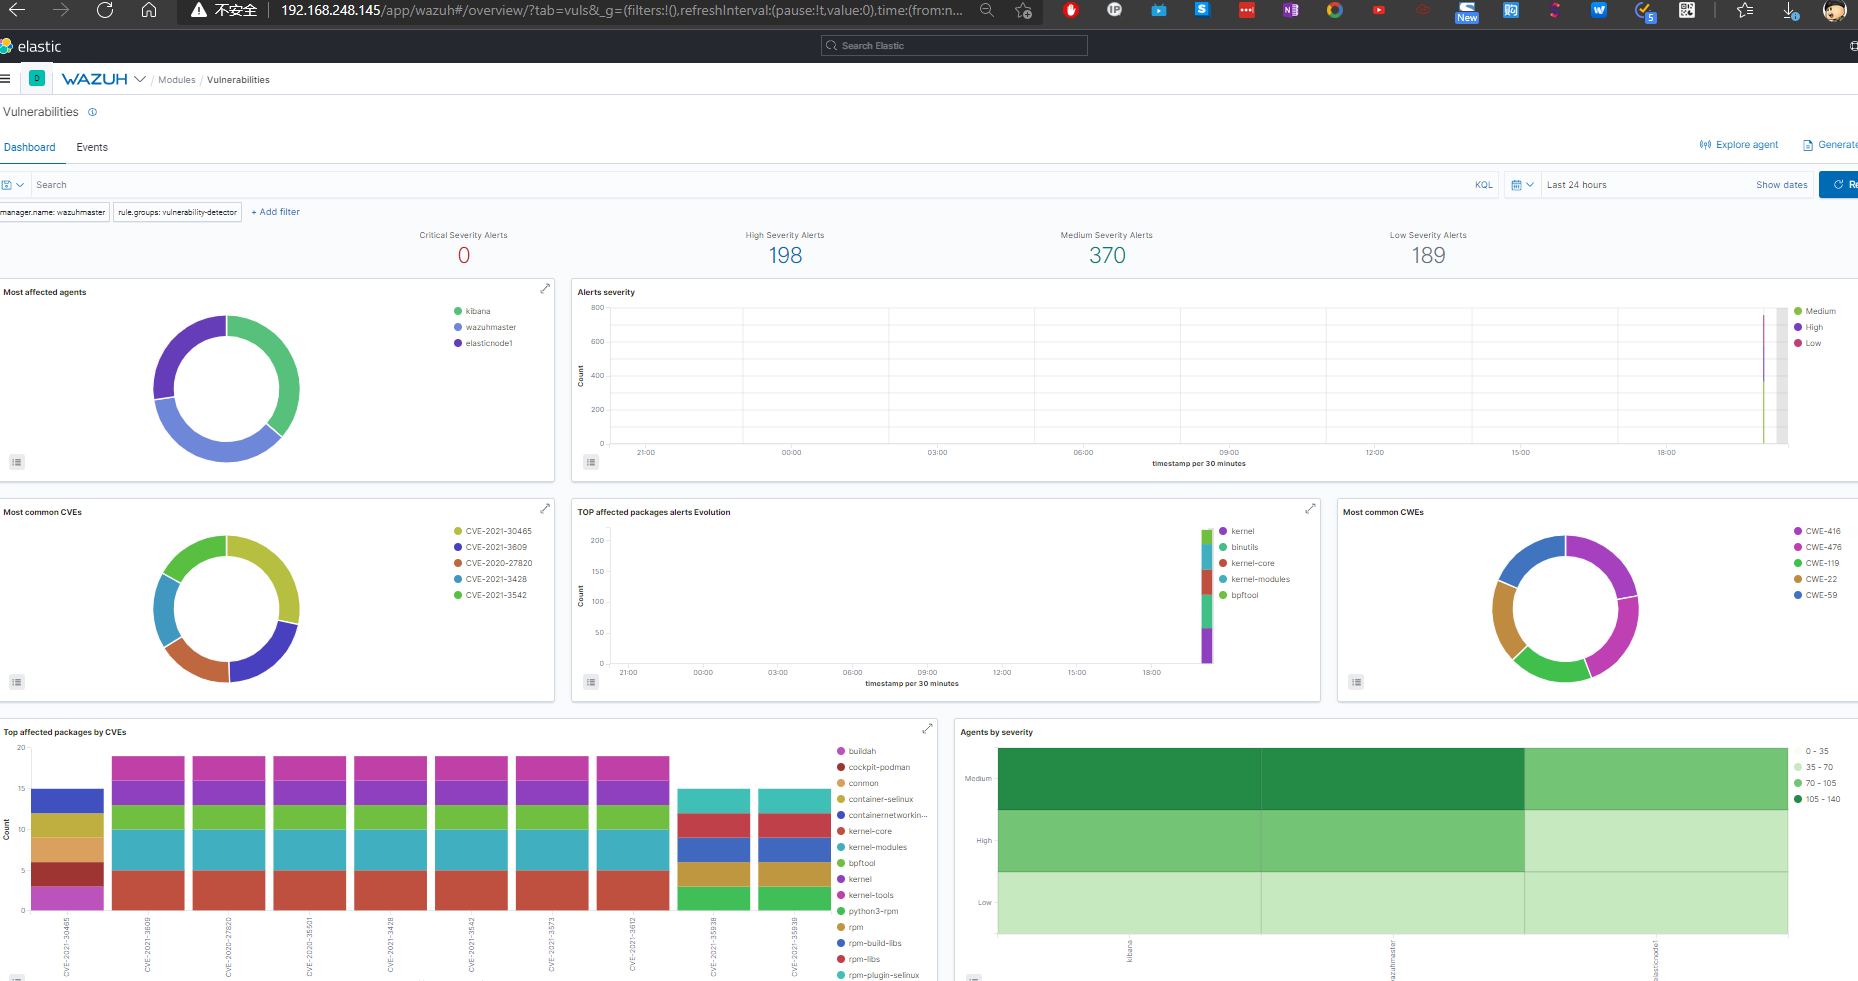
通过Wazuh实现漏洞扫描
Wazuh是个复杂的积木式系统,由ossec、ElasticStack和wazuh插件以及第三方的漏扫、病毒查杀、文件监控等等安全工具组合而成。本文将简述Wazuh的漏洞扫描模块的使用。 应用原理 Wazuh不是一个漏洞扫描工具,它只是借助本身的功能模块来实现对操作系统的漏洞监控; Wazuh的漏扫依赖于Agent的对系统软件版本的扫描,上传至Master节点之后,通过在线或者离线加载的各个操作系统官方发布的CVE数据库以及美国政府发布的NVD数据库来进行对比,从而实现漏洞的检查和告警; Wazuh不使用爬虫、端口扫描等传统漏扫技术路径,所以对客户端主机的性能影响极小; Wazuh官方支持对数据库、中间件等软件进行漏洞扫描,但只支持操作系统发行官方库中的包,因为它是简单的按照软件包名来进行对比的; Wazuh可以对接Clamav、Suricata等其他安全系统。 漏洞扫描模块 配置离线文件123456789101112131415161718192021222324252627282930313233343536# 在wazuh-master上安装Nginxyum insta...

2021-08-01
Wazuh系统的群集化改造
综述在中大型网络环境中,单台Allinone的Wazuh系统或者单节点的分布式部署Wazuh系统从性能上已经无法满足日志分析和漏洞扫描的需求,因此应当采用高可用、多节点的分布式部署来满足Wazuh对CPU和存储的要求。 序号 系统描述 配置 网络地址 系统角色 1 Lvsnode1 1c/1g 192.168.79.51 LVS+KeepLived 提供VIP和负载均衡 2 Lvsnode2 1c/1g 192.168.79.52 LVS+KeepLived 提供VIP和负载均衡 3 Wazuhnode0 2c/2g 192.168.79.60 Wazuh主节点,提供认证以及cve库 4 Wazuhnode1 1c/1g 192.168.79.61 WazuhWorker,工作节点,提供事件日志分析和漏洞扫描 5 Wazuhnode2 1c/1g 192.168.79.62 WazuhWorker,工作节点,提供事件日志分析和漏洞扫描 6 KibanaNode 2c/4g 192.168....

2021-02-02
批量修改Windows主机本地管理员密码
在Windows活动目录中的主机依据合规的要求,至少每年都应当按照密码规则进行一次本地管理员的密码变更。 以下脚本是使用有域管理员权限的域账号进行批量执行来修改主机管理员密码。 123456789101112131415161718192021222324# Windows域主机变更本地管理员密码脚本# 执行需要有本地主机管理员权限的域账号# 执行需要本地主机开启powershell远程执行权限# 引入需要变更密码的主机$VMList = @('server1','server2','server3','server4')# 设立一个函数来执行密码变更function ChangeAdminPwd($VMName){ # 设定本地密码规则,非随机密码,便于使用passgen配合主机名和加盐规则推导主机密码 $LocalPwd = '#' + ((cmd /c "PassGen.exe -g $VMName billgate -l 20 -e 2"...
2022-01-01
WAZUH的从入门到上线
[Wazuh](Wazuh · The Open Source Security Platform)是一整套基于ossec安全检测工具和EFK日志工具构成的终端安全管理工具。不管是将其分类至HIDS,还是EDR,它都是一套通过监控主机日志行为,提供安全检测、分析和完整报告的开源、免费利器。Wazuh基于C/S架构,它的Agent支持Windows、MacOS、Linux、HP-UX、AIX等主流操作系统。其服务端负责提供认证和数据收集,然后通过filebeat进行日志清洗,最后导入ElasticSearch,通过Kinbana进行展示和输出日志。它不仅可以收集主机的事件日志进行一般的入侵检测功能,还可以通过第三方提供的系统漏洞检测feed文件,来实现主机的漏洞扫描和合规检查。 基本概念功能示例 组件模块Wazuh的组件分为三部分: 客户端的功能 收集日志和事件日志; 文件和注册表的监控; 运行进程和安装软件的信息收集; 监控系统端口和网络配置; 检测恶意软件; 配置管理和策略监控 检测主机响应 服务端 客户端的服务器注册; 实现客户端的连接服务; 根据各项规...

2025-03-03
Podman的安全
独栋别墅等同于在单个隔离节点上运行一个应用程序,双拼别墅等同于在单独的虚拟机中运行每个应用容器。酒店或者公寓楼类似于容器。你有自己的公寓,但你依赖前台的安全性来控制对你的居住空间的访问。如果前台被攻陷,那么你的公寓也会被攻陷。容器也类似于此,因为它们依赖内核的安全性。如果一个容器可以接管主机内核,那么它就可以接管系统上运行的所有容器化应用程序。此外,如果它们逃逸到底层文件系统,就可能读取和写入系统上的所有容器数据。 容器安全的最重要目标是保护主机内核和文件系统免受容器进程的影响。如果内核存在漏洞,那么系统的其余部分和所有容器都将易受攻击。大多数情况下,容器和主机之间唯一的接触点就是主机内核本身。 2025.02 广州·荔湾区·圆大厦 安全隔离只读的内核伪文件系统 Podman以只读方式挂载/sys、/sys/fs/cgroup、/sys/fs/selinux 容器内部/proc不是主机的/proc,容器内部进程只能影响容器内的其他进程 在/proc/acpi、&#x...