Wazuh系统的群集化改造
综述
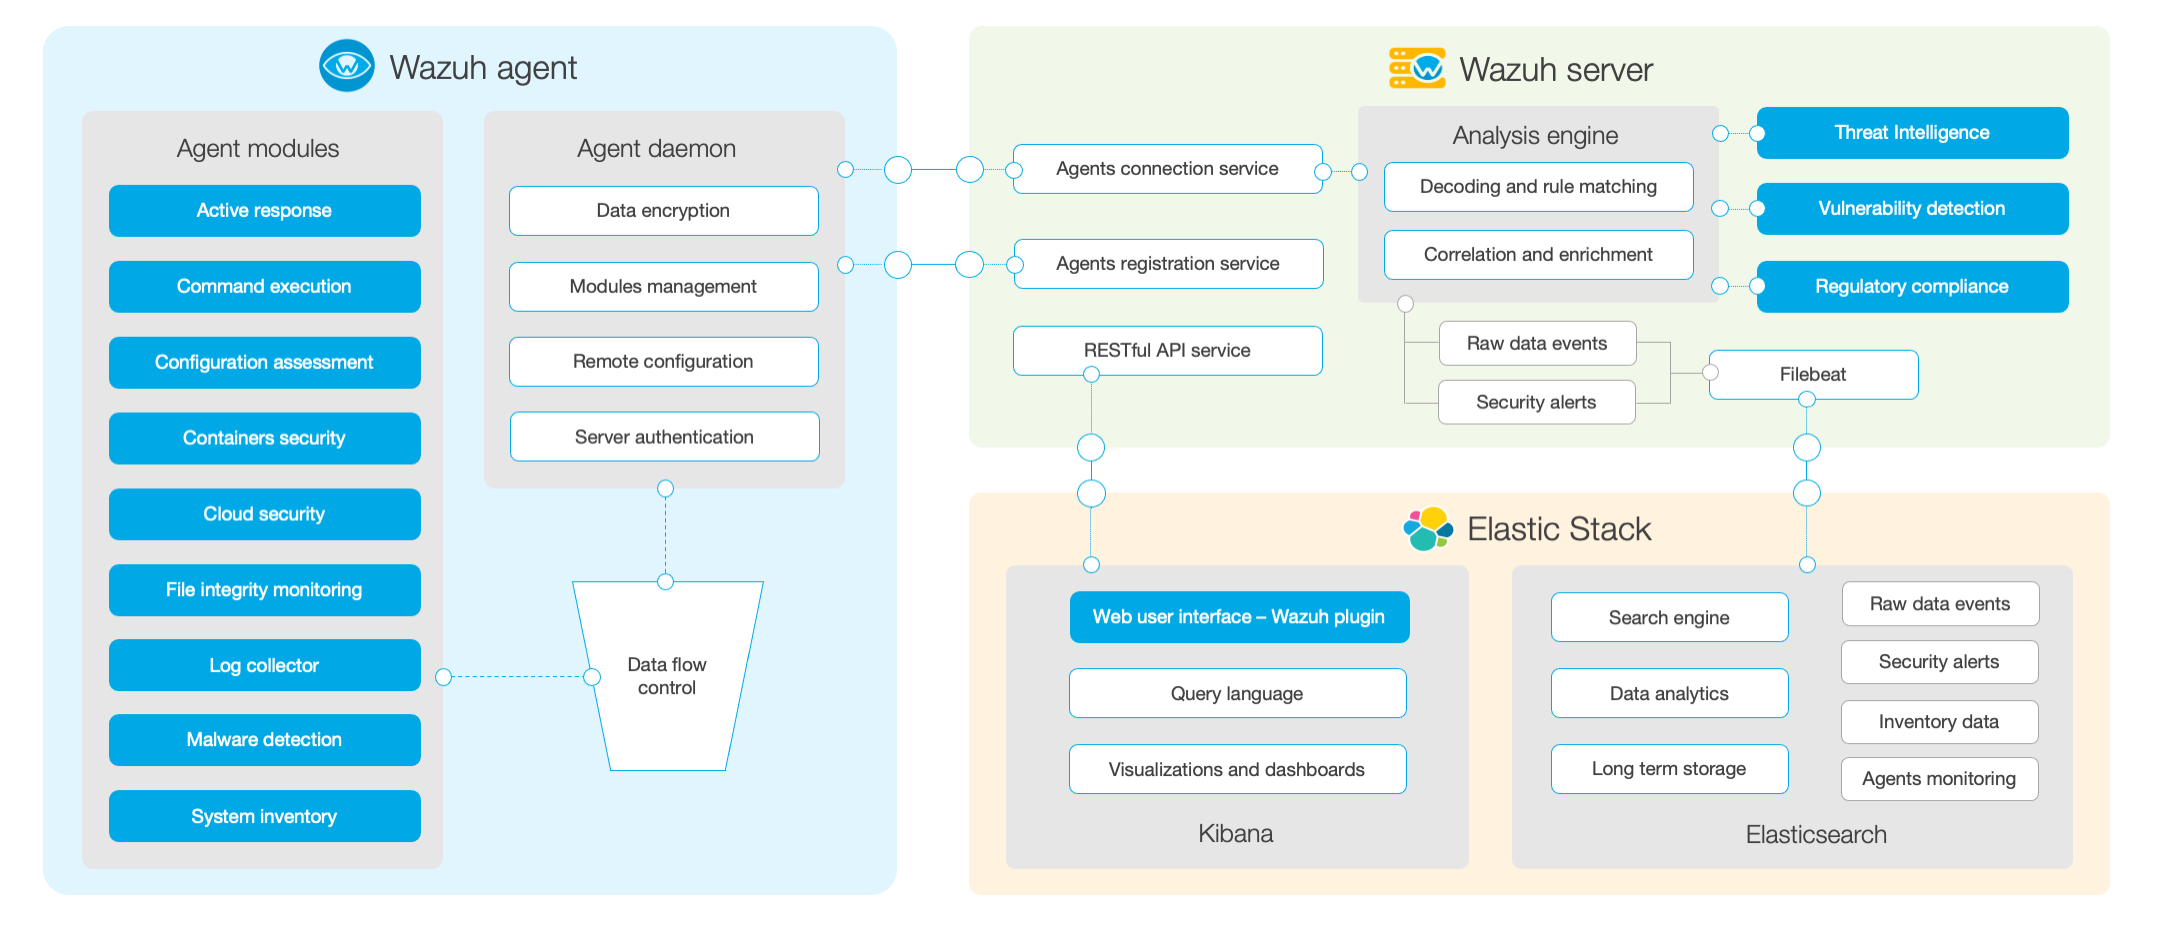
在中大型网络环境中,单台Allinone的Wazuh系统或者单节点的分布式部署Wazuh系统从性能上已经无法满足日志分析和漏洞扫描的需求,因此应当采用高可用、多节点的分布式部署来满足Wazuh对CPU和存储的要求。
| 序号 | 系统描述 | 配置 | 网络地址 | 系统角色 |
|---|---|---|---|---|
| 1 | Lvsnode1 | 1c/1g | 192.168.79.51 | LVS+KeepLived 提供VIP和负载均衡 |
| 2 | Lvsnode2 | 1c/1g | 192.168.79.52 | LVS+KeepLived 提供VIP和负载均衡 |
| 3 | Wazuhnode0 | 2c/2g | 192.168.79.60 | Wazuh主节点,提供认证以及cve库 |
| 4 | Wazuhnode1 | 1c/1g | 192.168.79.61 | WazuhWorker,工作节点,提供事件日志分析和漏洞扫描 |
| 5 | Wazuhnode2 | 1c/1g | 192.168.79.62 | WazuhWorker,工作节点,提供事件日志分析和漏洞扫描 |
| 6 | KibanaNode | 2c/4g | 192.168.79.80 | Kibana展示节点 |
| 7 | ElasticNode1 | 4c/4g | 192.168.79.81 | ElasticSearch 群集节点 |
| 8 | ElasticNode2 | 4c/4g | 192.168.79.82 | ElasticSearch 群集节点 |
| 9 | ElasticNode3 | 4c/4g | 192.168.79.83 | ElasticSearch 群集节点 |
| 10 | UbuntuNode | 1c/1g | 192.168.79.127 | Ubuntu 20.04 LTS 测试机 + Wordpress |
| 11 | CentOSNode | 1c/1g | 192.168.79.128 | CentOS 8.4 测试机 + PostgreSQL |
| 12 | WindowsNode | 2c/2g | 192.168.79.129 | Windows Server 2012R2 测试机+ SQL Server |
| 13 | VIP | ——- | 192.168.79.50 | 前端访问IP |
| 14 | Gateway | 1c/1g | 192.168.79.254 | 使用iKuai提供网关服务和外部DNS服务 |
以下内容仅限wazuh 4.5.1版本和ELK 7.11.2版本
后端存储群集
ElasticSearch三节点部署
1
2
3
4
5
6
7
8
9
10
11
12
13
14
15
16
17
18
19
20
21
22
23
24
25
26
27
28
29
30
31
32
33
34
35
36
37
38
39
40
41
42
43
44
45
46
47
48
49
50
51
# 安装前置软件
yum install -y zip unzip curl
# 导入秘钥
rpm --import https://artifacts.elastic.co/GPG-KEY-elasticsearch
# 增加官方源
cat > /etc/yum.repos.d/elastic.repo << EOF
[elasticsearch-7.x]
name=Elasticsearch repository for 7.x packages
baseurl=https://artifacts.elastic.co/packages/7.x/yum
gpgcheck=1
gpgkey=https://artifacts.elastic.co/GPG-KEY-elasticsearch
enabled=1
autorefresh=1
type=rpm-md
EOF
# 安装软件
yum makecache
yum upgrade -y
yum install -y elasticsearch-7.11.2
# 导入配置文件
cp -a /etc/elasticsearch/elasticsearch.yml{,_$(date +%F)}
# 依次在各个节点上设置
cat > /etc/elasticsearch/elasticsearch.yml << EOF
network.host: 192.168.79.81
node.name: elasticnode1
cluster.name: elastic
cluster.initial_master_nodes:
- elasticnode1
- elasticnode2
- elasticnode3
discovery.seed_hosts:
- 192.168.79.81
- 192.168.79.82
- 192.168.79.83
EOF
# 开通防火墙
firewall-cmd --permanent --add-service=elasticsearch
firewall-cmd --reload
# 启动服务
systemctl daemon-reload
systemctl enable elasticsearch
systemctl start elasticsearch
# 禁用软件源,避免非控升级组件
sed -i "s/^enabled=1/enabled=0/" /etc/yum.repos.d/elastic.repo
# 在各个节点上依次部署,注意变更主机名和IP地址ElasticSearch群集验证
1
2
3
4
5
6
7
8
9
10
11
12
13
14
15
16
17
18
19
20
21
22
23
24
sujx@LEGION:~$ curl http://192.168.79.81:9200/_cluster/health?pretty
{
"cluster_name" : "elastic",
"status" : "green",
"timed_out" : false,
"number_of_nodes" : 3,
"number_of_data_nodes" : 3,
"active_primary_shards" : 0,
"active_shards" : 0,
"relocating_shards" : 0,
"initializing_shards" : 0,
"unassigned_shards" : 0,
"delayed_unassigned_shards" : 0,
"number_of_pending_tasks" : 0,
"number_of_in_flight_fetch" : 0,
"task_max_waiting_in_queue_millis" : 0,
"active_shards_percent_as_number" : 100.0
}
sujx@LEGION:~$ curl http://192.168.79.81:9200/_cat/nodes?v
ip heap.percent ram.percent cpu load_1m load_5m load_15m node.role master name
192.168.79.83 10 86 0 0.08 0.08 0.03 cdhilmrstw - elasticnode3
192.168.79.82 18 97 0 0.01 0.12 0.08 cdhilmrstw * elasticnode2
192.168.79.81 16 95 0 0.06 0.08 0.08 cdhilmrstw - elasticnode1
处理系统群集
Wazuh Master的部署
1
2
3
4
5
6
7
8
9
10
11
12
13
14
15
16
17
18
19
20
21
22
23
24
25
26
27
28
29
30
31
32
33
34
35
36
37
38
39
40
41
42
43
44
45
46
47
48
49
50
51
52
53
54
55
56
57
58
59
60
61
62
63
64
65
66
67
68
69
70
71
72
73
74
75
76
77
78
79
80
81
82
83
84
85
86
87
88
89
90
91
92
93
94
95
96
97
98
99
100
101
102
103
104
105
106
107
# 安装前置软件
yum install -y zip unzip curl
# 导入秘钥
rpm --import https://packages.wazuh.com/key/GPG-KEY-WAZUH
rpm --import https://artifacts.elastic.co/GPG-KEY-elasticsearch
# 配置官方软件源
cat > /etc/yum.repos.d/wazuh.repo << EOF
[wazuh]
gpgcheck=1
gpgkey=https://packages.wazuh.com/key/GPG-KEY-WAZUH
enabled=1
name=EL-$releasever - Wazuh
baseurl=https://packages.wazuh.com/4.x/yum/
protect=1
EOF
cat > /etc/yum.repos.d/elastic.repo << EOF
[elasticsearch-7.x]
name=Elasticsearch repository for 7.x packages
baseurl=https://artifacts.elastic.co/packages/7.x/yum
gpgcheck=1
gpgkey=https://artifacts.elastic.co/GPG-KEY-elasticsearch
enabled=1
autorefresh=1
type=rpm-md
EOF
# 安装软件
yum makecache
yum upgrade -y
yum install -y wazuh-manager
yum install -y filebeat-7.11.2
# 配置Filebeat
cp -a /etc/filebeat/filebeat.yml{,_$(date +%F)}
cat > /etc/filebeat/filebeat.yml<<EOF
filebeat.modules:
- module: wazuh
alerts:
enabled: true
archives:
enabled: false
setup.template.json.enabled: true
setup.template.json.path: '/etc/filebeat/wazuh-template.json'
setup.template.json.name: 'wazuh'
setup.template.overwrite: true
setup.ilm.enabled: false
output.elasticsearch.hosts: ['http://192.168.79.81:9200','http://192.168.79.82:9200','http://192.168.79.83:9200']
EOF
# 导入filebeat的wazuh日志模板
curl -so /etc/filebeat/wazuh-template.json https://raw.githubusercontent.com/wazuh/wazuh/4.1/extensions/elasticsearch/7.x/wazuh-template.json
chmod go+r /etc/filebeat/wazuh-template.json
# 导入filebeat的wazuh日志模型
curl -s https://packages.wazuh.com/4.x/filebeat/wazuh-filebeat-0.1.tar.gz | tar -xvz -C /usr/share/filebeat/module
# 配置防火墙规则
firewall-cmd --permanent --add-port={1514/tcp,1515/tcp,1516/tcp,55000/tcp}
firewall-cmd --reload
# 禁用软件源,避免非控升级组件
sed -i "s/^enabled=1/enabled=0/" /etc/yum.repos.d/elastic.repo
sed -i "s/^enabled=1/enabled=0/" /etc/yum.repos.d/wazuh.repo
# 启动服务
systemctl daemon-reload
systemctl enable --now wazuh-manager
systemctl enable --now filebeat
# 测试filebeat
[root@WazuhNode0 wazuh]# filebeat test output
elasticsearch: http://192.168.79.81:9200...
parse url... OK
connection...
parse host... OK
dns lookup... OK
addresses: 192.168.79.81
dial up... OK
TLS... WARN secure connection disabled
talk to server... OK
version: 7.11.2
elasticsearch: http://192.168.79.82:9200...
parse url... OK
connection...
parse host... OK
dns lookup... OK
addresses: 192.168.79.82
dial up... OK
TLS... WARN secure connection disabled
talk to server... OK
version: 7.11.2
elasticsearch: http://192.168.79.83:9200...
parse url... OK
connection...
parse host... OK
dns lookup... OK
addresses: 192.168.79.83
dial up... OK
TLS... WARN secure connection disabled
talk to server... OK
version: 7.11.2Wazuh worker的部署
1
2
3
4
5
6
7
8
9
10
11
12
13
14
15
16
17
18
19
20
21
22
23
24
25
26
27
28
29
30
31
32
33
34
35
36
37
38
39
40
41
# 同Master部署一致
# 安装软件
yum install -y wazuh-manager
yum install -y filebeat-7.11.2
# 配置Filebeat
cp -a /etc/filebeat/filebeat.yml{,_$(date +%F)}
cat > /etc/filebeat/filebeat.yml<<EOF
filebeat.modules:
- module: wazuh
alerts:
enabled: true
archives:
enabled: false
setup.template.json.enabled: true
setup.template.json.path: '/etc/filebeat/wazuh-template.json'
setup.template.json.name: 'wazuh'
setup.template.overwrite: true
setup.ilm.enabled: false
output.elasticsearch.hosts: ['http://192.168.79.81:9200','http://192.168.79.82:9200','http://192.168.79.83:9200']
EOF
# 导入filebeat的wazuh日志模板
curl -so /etc/filebeat/wazuh-template.json https://raw.githubusercontent.com/wazuh/wazuh/4.1/extensions/elasticsearch/7.x/wazuh-template.json
chmod go+r /etc/filebeat/wazuh-template.json
# 导入filebeat的wazuh日志模型
curl -s https://packages.wazuh.com/4.x/filebeat/wazuh-filebeat-0.1.tar.gz | tar -xvz -C /usr/share/filebeat/module
# 配置防火墙规则
firewall-cmd --permanent --add-port={1514/tcp,1516/tcp}
firewall-cmd --reload
# 启动服务
systemctl daemon-reload
systemctl enable --now wazuh-manager
systemctl enable --now filebeat实现wazuh群集
1
2
3
4
5
6
7
8
9
10
11
12
13
14
15
16
17
18
19
20
21
22
23
24
25
26
27
28
29
30
31
32
33
34
35
36
37
38
39
40
41
42
43
44
45
# 进行群集认证
# Master节点
#生成随机串值
openssl rand -hex 16
d84691d111f86e70e8ed7eff80cde39e
# 编辑ossec.conf的cluster
<cluster>
<name>wazuh</name>
<node_name>wazuhnode0</node_name>
<node_type>master</node_type>
<key>d84691d111f86e70e8ed7eff80cde39e</key>
<port>1516</port>
<bind_addr>0.0.0.0</bind_addr>
<nodes>
<node>192.168.79.60</node>
</nodes>
<hidden>no</hidden>
<disabled>no</disabled>
</cluster>
# Worker节点
# 编辑ossec.conf的cluster
<cluster>
<name>wazuh</name>
<node_name>wazuhnode1</node_name>
<node_type>worker</node_type>
<key>d84691d111f86e70e8ed7eff80cde39e</key>
<port>1516</port>
<bind_addr>0.0.0.0</bind_addr>
<nodes>
<node>192.168.79.60</node>
</nodes>
<hidden>no</hidden>
<disabled>no</disabled>
</cluster>
# 验证
[root@WazuhNode0 bin]# ./cluster_control -l
NAME TYPE VERSION ADDRESS
wazuhnode0 master 4.1.5 192.168.79.60
wazuhnode1 worker 4.1.5 192.168.79.61
wauzhnode2 worker 4.1.5 192.168.79.62
前端访问群集
概览
前端部署采用Keeplived+Nginx代理的模式,提供一个VIP供Wazuh的agent进行部署。
部署Nginx的TCP代理节点
1
2
3
4
5
6
7
8
9
10
11
12
13
14
15
16
17
18
19
20
21
22
23
24
25
26
27
28
29
30
31
32
33
34
35
36
37
38
39
40
41
42
43
44
45
46
47
48
49
50
51
52
53
54
55
56
57
58
59
60
61
62
63
64
65
66
67
68
69
70
71
72
73
74
75
76
77
78
79
80
81
82
83
84
85
86
87
88
89
90
91
92
93
94
95
96
97
98
99
100
101
102
103
# 部署第一个节点Node1
# 开放防火墙端口
firewall-cmd --permanent --add-port={1514/tcp,1515/tcp}
firewall-cmd --reload
# 新增官方源地址
cat > /etc/yum.repos.d/nginx.repo <<\EOF
[nginx]
name=nginx repo
baseurl=http://nginx.org/packages/centos/$releasever/$basearch/
gpgcheck=0
enabled=1
EOF
# 安装Nginx
yum makecache
yum install -y nginx
systemctl daemon-reload
systemctl enable nginx.service --now
# 配置stream
cd /etc/nginx
cp -a nginx.conf{,_$(date +%F)}
cat >> /etc/nginx/nginx.conf <<EOF
include /etc/nginx/stream.d/*.conf;
EOF
mkdir ./stream.d
touch /etc/nginx/stream.d/wazuh.conf
cat > /etc/nginx/stream.d/wazuh.conf<<EOF
stream {
upstream cluster {
hash $remote_addr consistent;
server 192.168.79.61:1514;
server 192.168.79.62:1514;
}
upstream master {
server 192.168.79.60:1515;
}
server {
listen 1514;
proxy_pass cluster;
}
server {
listen 1515;
proxy_pass master;
}
}
EOF
# 重启Nginx
systemctl restart nginx
# 检查端口情况
[root@lvsnode1 nginx]# netstat -tlnp
Active Internet connections (only servers)
Proto Recv-Q Send-Q Local Address Foreign Address State PID/Program name
tcp 0 0 0.0.0.0:1514 0.0.0.0:* LISTEN 1897/nginx: master
tcp 0 0 0.0.0.0:1515 0.0.0.0:* LISTEN 1897/nginx: master
tcp 0 0 0.0.0.0:80 0.0.0.0:* LISTEN 1897/nginx: master
tcp 0 0 0.0.0.0:22 0.0.0.0:* LISTEN 1022/sshd
tcp6 0 0 :::80 :::* LISTEN 1897/nginx: master
tcp6 0 0 :::22 :::* LISTEN 1022/sshd
# 安装Keeplived
yum install -y keepalived
cd /etc/keepalived/
cp -a keepalived.conf{,_$(date +%F)}
# 进行配置
cat > keepalived.conf<<EOF
# Configuration File for keepalived
#
global_defs {
router_id nginxnode1
vrrp_mcast_group4 224.0.0.18
lvs_timeouts tcp 900 tcpfin 30 udp 300
lvs_sync_daemon ens160 route_lvs
vrrp_skip_check_adv_addr
#vrrp_strict
vrrp_garp_interval 0
vrrp_gna_interval 0
}
vrrp_instance route_lvs {
state BACKUP
priority 100
virtual_router_id 18
interface ens160
track_interface {
ens160
}
advert_int 3
authentication {
auth_type PASS
auth_pass password
}
virtual_ipaddress {
192.168.79.50/24 dev ens160 label ens160:0
}
}
EOF
systemctl enable keepalived.service --now验证服务
1
2
3
4
5
6
7
8
9
10
11
12
13
14
15
16
17
18
19
sujx@LEGION:~$ ping 192.168.79.50
PING 192.168.79.50 (192.168.79.50) 56(84) bytes of data.
64 bytes from 192.168.79.50: icmp_seq=1 ttl=64 time=0.330 ms
64 bytes from 192.168.79.50: icmp_seq=2 ttl=64 time=0.306 ms
--- 192.168.79.50 ping statistics ---
3 packets transmitted, 3 received, 0% packet loss, time 2002ms
rtt min/avg/max/mdev = 0.306/0.430/0.655/0.159 ms
sujx@LEGION:~$ telnet 192.168.79.50 1515
Trying 192.168.79.140...
Connected to 192.168.79.140.
Escape character is '^]'.
sujx@LEGION:~$ telnet 192.168.79.50 1514
Trying 192.168.79.140...
Connected to 192.168.79.140.
Escape character is '^]'.
面板访问群集
部署Elastic协调节点
1
2
3
4
5
6
7
8
9
10
11
12
13
14
15
16
17
18
19
20
21
22
23
24
25
26
27
28
29
30
31
32
33
34
35
36
37
38
39
40
41
42
43
44
45
46
47
48
49
50
51
52
53
54
55
56
# 如果 Elasticsearch 集群有多个节点,分发 Kibana 节点之间请求的最简单的方法就是在 Kibana 机器上运行一个 Elasticsearch 协调(Coordinating only node) 的节点。Elasticsearch 协调节点本质上是智能负载均衡器,也是集群的一部分,如果有需要,这些节点会处理传入 HTTP 请求,重定向操作给集群中其它节点,收集并返回结果
# 在Kibana节点上安装Elasticsearch
# 安装前置软件
yum install -y zip unzip curl
# 导入源秘钥
rpm --import https://artifacts.elastic.co/GPG-KEY-elasticsearch
# 增加官方源
cat > /etc/yum.repos.d/elastic.repo << EOF
[elasticsearch-7.x]
name=Elasticsearch repository for 7.x packages
baseurl=https://artifacts.elastic.co/packages/7.x/yum
gpgcheck=1
gpgkey=https://artifacts.elastic.co/GPG-KEY-elasticsearch
enabled=1
autorefresh=1
type=rpm-md
EOF
# 安装软件
yum makecache
yum upgrade -y
yum install -y elasticsearch-7.11.2
#配置防火墙
firewall-cmd --permanent --add-service=http
firewall-cmd --permanent --add-service=elasticsearch
firewall-cmd --reload
# 修改配置
# 其他ES节点也需要增加该主机NodeIP,并重启服务
cat >> /etc/elasticsearch/elasticsearch.yml<<EOF
node.name: kibananode0
cluster.name: elastic
node.master: false
node.data: false
node.ingest: false
network.host: localhost
http.port: 9200
transport.host: 192.168.79.80
transport.tcp.port: 9300
discovery.seed_hosts:
- 192.168.79.81
- 192.168.79.82
- 192.168.79.83
- 192.168.79.80
EOF
# 查看群集信息,只允许本机Kibana访问
[root@kibana wazuh]# curl http://localhost:9200/_cat/nodes?v
ip heap.percent ram.percent cpu load_1m load_5m load_15m node.role master name
192.168.79.81 18 96 0 0.04 0.06 0.02 cdhilmrstw - elasticnode1
192.168.79.80 12 97 3 0.01 0.08 0.07 lr - kibananode0
192.168.79.82 23 96 0 0.04 0.09 0.04 cdhilmrstw * elasticnode2
192.168.79.83 23 87 0 0.09 0.11 0.05 cdhilmrstw - elasticnode3配置Kibana
1
2
3
4
5
6
7
8
9
10
11
12
13
14
15
16
17
18
19
20
21
22
23
24
25
26
27
28
29
30
31
32
33
34
35
36
37
38
39
40
41
42
43
44
45
46
47
48
49
50
51
52
53
54
yum install -y kibana-7.11.2
# 修改配置文件
cp -a /etc/kibana/kibana.yml{,_$(date +%F)}
cat >> /etc/kibana/kibana.yml << EOF
server.port: 5601
server.host: "localhost"
server.name: "kibana"
i18n.locale: "zh-CN"
elasticsearch.hosts: ["http://localhost:9200"]
kibana.index: ".kibana"
kibana.defaultAppId: "home"
server.defaultRoute : "/app/wazuh"
EOF
# 创建数据目录
mkdir /usr/share/kibana/data
chown -R kibana:kibana /usr/share/kibana
# 离线安装插件
wget https://packages.wazuh.com/4.x/ui/kibana/wazuh_kibana-4.1.5_7.11.2-1.zip
cp ./wazuh_kibana-4.1.5_7.11.2-1.zip /tmp
cd /usr/share/kibana
sudo -u kibana /usr/share/kibana/bin/kibana-plugin install file:///tmp/wazuh_kibana-4.1.5_7.11.2-1.zip
# 配置服务
systemctl daemon-reload
systemctl enable kibana
systemctl start kibana
# 禁用软件源,避免非控升级组件
sed -i "s/^enabled=1/enabled=0/" /etc/yum.repos.d/elastic.repo
# 配置反向代理
yum install -y nginx
systemctl enable --now nginx
vim /etc/ngix/nginx.conf
# 在server{}中添加配置项
```
proxy_redirect off;
proxy_set_header X-Real-IP $remote_addr;
proxy_set_header X-Forwarded-For $proxy_add_x_forwarded_for;
proxy_set_header Host $http_host;
location / {
proxy_pass http://localhost:5601/;
}
```
nginx -s reload
# 登录kibana之后选择wazuh插件
# 返回控制台修改插件配置文件
sed -i "s/localhost/192.168.79.60/g" /usr/share/kibana/data/wazuh/config/wazuh.yml
客户端验证
部署Wazuh-Agent
1
2
3
4
5
6
7
8
9
10
11
12
13
14
# CentOS主机
sudo WAZUH_MANAGER='192.168.79.50' WAZUH_AGENT_GROUP='default' yum install https://packages.wazuh.com/4.x/yum/wazuh-agent-4.1.5-1.x86_64.rpm -y
# Ubuntu主机
curl -so wazuh-agent.deb https://packages.wazuh.com/4.x/apt/pool/main/w/wazuh-agent/wazuh-agent_4.1.5-1_amd64.deb && sudo WAZUH_MANAGER='192.168.79.60' WAZUH_AGENT_GROUP='default' dpkg -i ./wazuh-agent.deb
# 启动服务
systemctl daemon-reload
systemctl enable wazuh-agent
systemctl start wazuh-agent
# Windows主机
Invoke-WebRequest -Uri https://packages.wazuh.com/4.x/windows/wazuh-agent-4.1.5-1.msi -OutFile wazuh-agent.msi; ./wazuh-agent.msi /q WAZUH_MANAGER='192.168.79.50' WAZUH_REGISTRATION_SERVER='192.168.79.50' WAZUH_AGENT_GROUP='default'
start-service wazuh验证客户端所在管理节点
All articles on this blog are licensed under CC BY-NC-SA 4.0 unless otherwise stated.


