RockyLinux9 容器安装
|Word Count:1.7k|Reading Time:8mins|Post Views:
RockyLinux虽然自带了Podman,但Docker的操作还是便利些。
首先,需要按照制作RockyLinux模板来对系统进行初始化,再进行容器的部署。
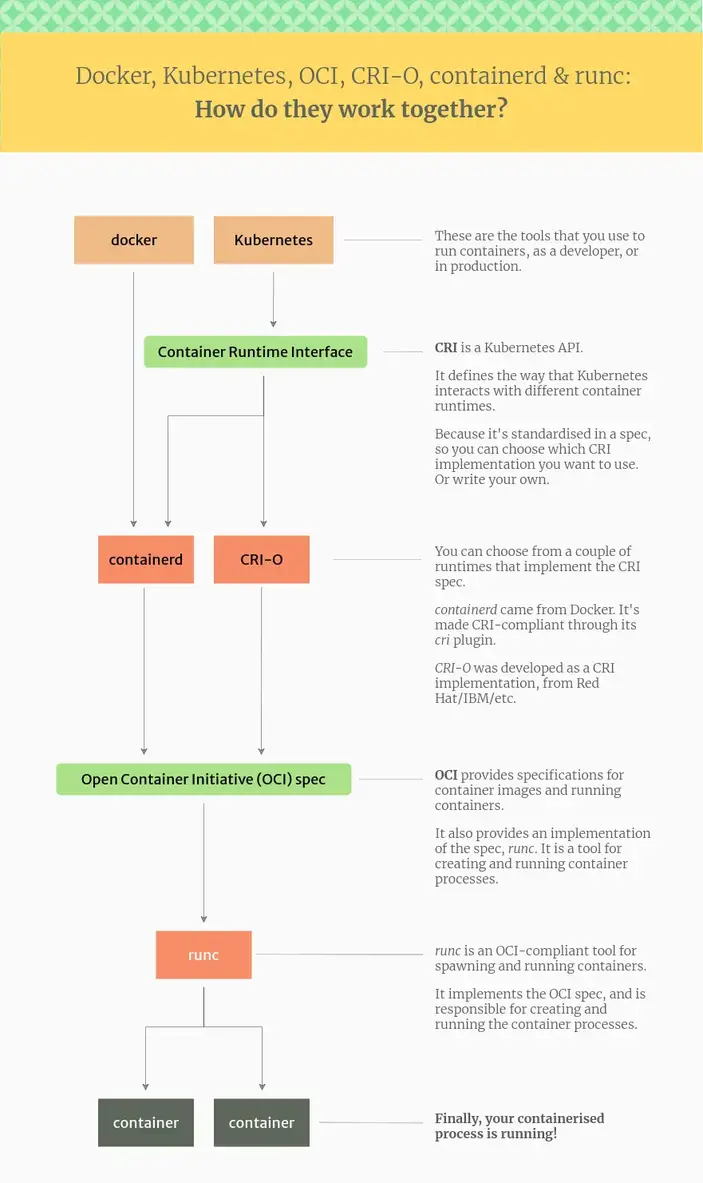
其次,因为Docker公司的各种骚操作,开源界出品了Podman来对抗Docker,同时Kubernetes相关组织提出了一个标准的API接口CRI(Container Runntime Interface),并开发了CRI-O来作为containerd的替代品。简单理一下概念就是Docker、Podman和Kubernetes、Openshfit都是管理容器的平台,只不过前两个是单机、后两个是集群的全套解决方案。而containerd和CRI-O则是底层实现,类似Linux Kernel和发行版的区别。
最后,Kubernetes是通过标准的CRI接口调用containerd或者CRI-O来编排和管理容器。
Docker
部署
1
2
3
4
5
6
7
8
9
10
11
12
13
14
15
16
17
18
19
20
21
22
23
24
25
26
27
28
29
30
31
32
33
34
35
36
37
38
39
40
41
42
43
44
45
46
47
48
49
50
51
52
53
54
55
56
57
58
59
60
61
62
63
| # 卸载Podman
dnf remove -y podman*
dnf install -y yum-utils device-mapper-persistent-data lvm2 jq
# 官方安装案例
# curl -fsSL https://get.docker.com -o get-docker.sh
# sh ./get-docker.sh --dry-run
# 添加软件源信息
dnf config-manager --add-repo https://mirrors.aliyun.com/docker-ce/linux/centos/docker-ce.repo
sed -i 's+download.docker.com+mirrors.aliyun.com/docker-ce+' /etc/yum.repos.d/docker-ce.repo
# 更新并安装Docker-CE
dnf makecache
dnf install -y docker-ce docker-ce-cli containerd.io docker-buildx-plugin docker-compose-plugin
# 安装并锁定版本
dnf install -y python3-dnf-plugin-versionlock
dnf versionlock add docker-ce
# 使用2376端口进行进程监听(选作,有安全风险)
# sed -e 's|ExecStart=/usr/bin/dockerd|ExecStart=/usr/bin/dockerd -H tcp://0.0.0.0:2376|g' -i.bak /usr/lib/systemd/system/docker.service
# 关闭SWAP
swapoff -a ; sed -i '/swap/d' /etc/fstab
# 修改内核加载模块
cat > /etc/modules-load.d/containerd.conf <<EOF
overlay
br_netfilter
EOF
# 加载模块
modprobe br_netfilter
cat > /etc/sysctl.conf <<EOF
net.bridge.bridge-nf-call-ip6tables = 1
net.bridge.bridge-nf-call-iptables = 1
net.ipv4.ip_forward = 1
EOF
# 配置加速源
mkdir -p /etc/docker
tee /etc/docker/daemon.json <<-'EOF'
{
"group": "docker",
"registry-mirrors": ["https://37y8py0j.mirror.aliyuncs.com"],
"exec-opts": ["native.cgroupdriver=systemd"]
}
EOF
# 重新加载并配置开机启动
systemctl daemon-reload
systemctl enable --now docker
# 拉取测试镜像
docker pull traefik/whoami
docker run -itd --rm -p 80:80 traefik/whoami:latest
curl localhost
# 安装图形管理界面
docker pull docker.io/portainer/portainer
docker run -d -p 9000:9000 --restart=always -v /var/run/docker.sock:/var/run/docker.sock --name docker-ui portainer/portainer
|
非root执行
1
2
3
4
| # 将指定用户添加到docker用户组中,让普通用户也可以执行docker操作
# docker拉起的容器仍然是以root权限执行
sudo usermod -a -G docker $USER
docker info
|
Containerd
概念
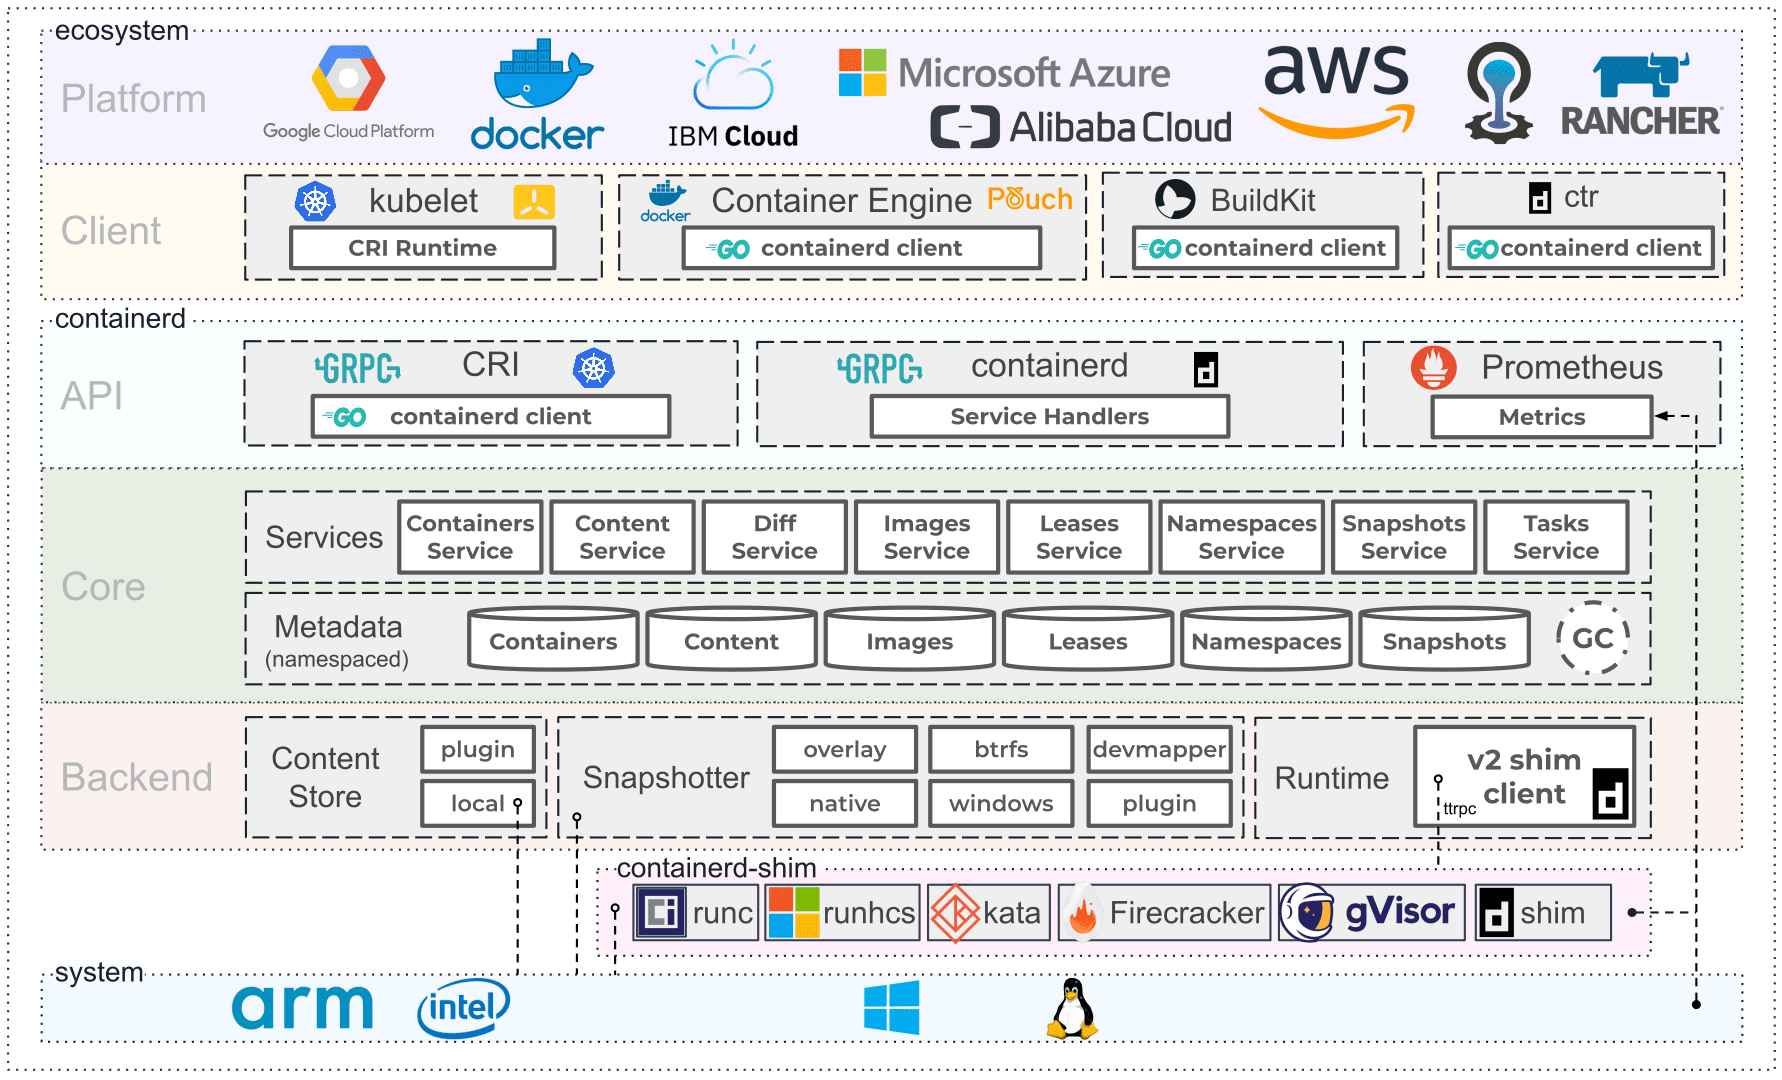
containerd是Docker的核心依赖,是Docker剥离了上层的管理工具后的单纯底层容器服务提供,是Docker公司捐献给公共平台的。实际上,安装docker也一样要安装containerd.io。只不过,我们可以选择只安装containerd.io,而不安装docker-ce、docker-ce-cli、docker-compose,后续的配置也需要手动管理。
部署
1
2
3
4
5
6
7
8
9
10
11
12
13
14
15
16
17
18
19
20
21
22
23
24
25
26
27
28
29
30
31
32
33
34
35
36
37
38
39
40
41
42
43
44
45
46
47
48
49
50
51
52
53
54
55
56
57
58
59
60
61
62
63
64
65
66
67
68
69
70
71
72
| # 本次部署基于RockyLinux 9.2
# 主机配置为2core CPU/2GB MEM/40GB Disk
# 设置防火墙
firewall-cmd --set-default-zone=trusted
firewall-cmd --reload
# 关闭selinux
sed -i 's/enforceing/disabled' /etc/selinux/config
# 关闭SWAP
swapoff -a ; sed -i '/swap/d' /etc/fstab
# 修改内核加载模块
cat > /etc/modules-load.d/containerd.conf <<EOF
overlay
br_netfilter
EOF
cat > /etc/sysctl.d/k8s.conf <<EOF
net.bridge.bridge-nf-call-ip6tables = 1
net.bridge.bridge-nf-call-iptables = 1
net.ipv4.ip_forward = 1
EOF
# 卸载Podman
dnf remove -y podman*
dnf install -y yum-utils device-mapper-persistent-data lvm2
# 添加软件源信息
dnf config-manager --add-repo https://mirrors.aliyun.com/docker-ce/linux/centos/docker-ce.repo
sed -i 's+download.docker.com+mirrors.aliyun.com/docker-ce+' /etc/yum.repos.d/docker-ce.repo
# 更新并安装Docker-CE
dnf makecache
dnf install -y containerd.io python3-dnf-plugin-versionlock
dnf versionlock add containerd.io
# 创建服务启动配置文件
containerd config default > /etc/containerd/config.toml
# 修改CgroupDriver为systemd
# 添加加速器地址
# 将OOM限制由0改为-999,即遇到OOM情况时杀死容器而不是进程
# pause镜像地址使用lank8s.cn做代理
sed -e 's|systemd_cgroup = false|systemd_cgroup = true|g' -e 's|oom_score = 0|oom_score = -999|g' -e 's|registry.k8s.io|lank8s.cn|g' -e 's|config_path = ""|config_path = "/etc/containerd/certs.d"|g' -i.bak /etc/containerd/config.toml
# 创建加速器配置文件
mkdir -pv /etc/containerd/certs.d/docker.io/
cat >> /etc/containerd/certs.d/docker.io/hosts.toml <<EOF
[host."https://37y8py0j.mirror.aliyuncs.com"]
capabilities = ["pull", "reslove"]
EOF
mkdir -pv /etc/containerd/certs.d/registry.k8s.io/
cat >> /etc/containerd/certs.d/registry.k8s.io/hosts.toml <<EOF
[host."https://lank8s.cn"]
capabilities = ["pull", "reslove"]
EOF
# 重新加载并配置开机启动
systemctl daemon-reload
systemctl enable --now containerd
# 加载github的Hosts地址
# sh -c 'sed -i "/# GitHub520 Host Start/Q" /etc/hosts && curl https://raw.hellogithub.com/hosts >> /etc/hosts'
# 重启
sync
ldconfig
# 启动服务
systemctl enable --now containerd
|
使用
1
2
3
4
5
6
7
8
9
10
11
12
13
14
15
16
17
18
19
20
21
22
23
24
25
26
27
28
29
30
31
32
33
34
35
36
37
38
39
40
41
42
43
44
45
46
47
48
49
50
51
52
53
54
55
56
57
58
59
60
61
62
63
64
65
66
| # 镜像管理命令
ctr images ls 查看镜像
ctr images pull 拉取镜像
ctr images rm 删除镜像
ctr images mount 挂载
ctr images unmount 卸载
# 容器管理命令
ctr containers ls 查看容器
ctr containers create 创建容器而不运行
ctr containers rm 删除容器
# 任务管理命令
ctr tasks start -d 在后台运行容器
ctr tasks attach 附加容器
ctr tasks exec --exec-id 12312312 (随机字符串) 执行容器进程
ctr tasks kill -s SIGKILL 发送终止信号给task
# 实际案例
# 拉取镜像
[root@Rocky ~]# ctr i pull docker.io/library/busybox:latest
docker.io/library/busybox:latest: resolved |++++++++++++++++++++++++++++++++++++++|
index-sha256:3fbc632167424a6d997e74f52b878d7cc478225cffac6bc977eedfe51c7f4e79: done |++++++++++++++++++++++++++++++++++++++|
manifest-sha256:023917ec6a886d0e8e15f28fb543515a5fcd8d938edb091e8147db4efed388ee: done |++++++++++++++++++++++++++++++++++++++|
layer-sha256:3f4d90098f5b5a6f6a76e9d217da85aa39b2081e30fa1f7d287138d6e7bf0ad7: done |++++++++++++++++++++++++++++++++++++++|
config-sha256:a416a98b71e224a31ee99cff8e16063554498227d2b696152a9c3e0aa65e5824: done |++++++++++++++++++++++++++++++++++++++|
elapsed: 9.5 s total: 2.0 Mi (216.0 KiB/s)
unpacking linux/amd64 sha256:3fbc632167424a6d997e74f52b878d7cc478225cffac6bc977eedfe51c7f4e79...
done: 146.334782ms
# 创建容器
[root@Rocky ~]# ctr c create docker.io/library/busybox:latest test
# 列出容器
[root@Rocky ~]# ctr c ls
CONTAINER IMAGE RUNTIME
test docker.io/library/busybox:latest io.containerd.runc.v2
# 启动名为test的任务
[root@Rocky ~]# ctr t start -d test
# 查看任务
[root@Rocky ~]# ctr t ls
TASK PID STATUS
test 3142 RUNNING
# 进入容器, --exec-id必须添加,数值可任意指定
[root@Rocky ~]# ctr t exec --exec-id 0 -t test sh
/ #
# 暂停容器
root@Rocky ~]# ctr t pause test
[root@Rocky ~]# ctr t ls
TASK PID STATUS
test 3142 PAUSED
# 恢复容器
[root@Rocky ~]# ctr t resume test
[root@Rocky ~]# ctr t ls
TASK PID STATUS
test 3142 RUNNING
# 停止容器
root@Rocky ~]# ctr t kill test
# 停止失败
[root@Rocky ~]# ctr t ls
TASK PID STATUS
test 3142 RUNNING
# 强制删除
[root@Rocky ~]# ctr t rm -f test
WARN[0000] task test exit with non-zero exit code 137
[root@Rocky ~]# ctr t ls
TASK PID STATUS
# 删除容器
[root@Rocky ~]# ctr c rm test
[root@Rocky ~]# ctr c ls
CONTAINER IMAGE RUNTIME
|
其他工具
1
2
3
4
5
6
7
8
9
10
11
12
13
14
15
16
17
18
19
20
21
22
23
24
25
26
27
28
29
30
| # nerdctl是一个操作方式和docker基本类似的工具,命令行兼容docker。
[root@Rocky ~]# wget https://github.com/containerd/nerdctl/releases/download/v1.6.2/nerdctl-1.6.2-linux-amd64.tar.gz
[root@Rocky ~]# tar zxvf -C nerdctl-1.6.2-linux-amd64.tar.gz /usr/local/bin/
[root@Rocky ~]# chmod +x /usr/local/bin/nerdctl
[root@Ansbile ~]# nerdctl info
Client:
Namespace: default
Debug Mode: false
Server:
Server Version: 1.6.24
Storage Driver: overlayfs
Logging Driver: json-file
Cgroup Driver: systemd
Cgroup Version: 2
Plugins:
Log: fluentd journald json-file syslog
Storage: native overlayfs
Security Options:
seccomp
Profile: builtin
cgroupns
Kernel Version: 5.14.0-284.30.1.el9_2.x86_64
Operating System: Rocky Linux 9.2 (Blue Onyx)
OSType: linux
Architecture: x86_64
CPUs: 2
Total Memory: 1.886GiB
Name: Ansbile
ID: 47625adf-ede9-49eb-ad08-ea667f133f16
|
参考链接
- Containerd 使用教程
- ctr工具的使用
- Docker使用教程


